Replace Soda with Homemade Kombucha
So you want to start making kombucha at home. Or maybe you are not quite sure what kombucha is. Here are a few basic answers for questions you might have about making your own kombucha at home.
Equipment
- Kitchen Scale
- Strainer (if using loose-leaf tea)
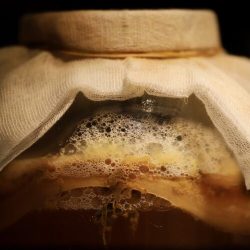
- Fermentation Vessel (Can be any kind of glass jar)
- Cover for vessel (you don’t need to be fancy, a cloth with a rubber band is what I use)
- Bottles for bottling
Ingredients
- 1120 g White Sugar
- 28 g Green or Black Tea (you can use teabags, but I find it easier and cheaper to buy loose-leaf tea)
- 1 SCOBY
- 1 cup Starter Liquid (raw, unflavored kombucha from a previous batch)
- 4 l Filtered Water
Instructions
- Begin by bringing your water to a gentle boil. While precise measurements are not critical, I'll provide you with the proportions I typically use.
- Once your water reaches a boil, remove it from the heat and carefully stir in your sugar and tea. Ensure thorough stirring to dissolve the sugar completely. Let the tea steep for approximately 10 minutes to extract its rich flavors.
- After steeping, remove the tea bags or strain the loose-leaf tea using a fine-mesh sieve or another pot.
- Now, a crucial step: allow your brewed tea to cool to room temperature. Adding the tea while it's still hot poses the risk of harming your SCOBY. For smaller batches, a few hours of cooling should suffice, while larger batches may benefit from overnight cooling.
- Once cooled, transfer your tea mixture into your fermentation vessel, along with the SCOBY and starter liquid. Don't fret too much about the SCOBY's positioning – whether it floats or sinks, it'll work its magic just the same.
- Cover your fermentation vessel with a breathable material, such as a clean dish towel secured with a rubber band. Now, it's time to let nature take its course. Set aside your vessel in a quiet corner and forget about it for about a week.
- After a week has passed, it's time to check on your kombucha's progress. Give it a taste test to gauge its flavor development. Remember, the fermentation time can vary based on factors like ambient temperature, starter liquid strength, and SCOBY health. Continue tasting daily until it reaches your desired level of tartness.
- Once your kombucha reaches the desired flavor, it's ready for the next phase: carbonation. Transfer your brew into fermentation-safe bottles, leaving some headspace at the top to accommodate carbonation buildup.
- Allow the bottled kombucha to sit at room temperature for a few more days to foster carbonation. For a little extra fizz, you can add a small amount (approximately 1/2 teaspoon) of sugar to each bottle to kickstart the carbonation process.
- If you're feeling adventurous, now's the perfect time to experiment with flavorings! Add your preferred fruits, herbs, or spices to infuse your kombucha with delightful new dimensions of taste.